Detail View Editor
What is the Detail View Editor?
The Detail View Editor (DVE) is a structured issue viewer and spreadsheet editor.
You can find a quick summary of the features and entry points in our video below.
Where can you open the Detail View Editor?
Any progress bar
You can access the Detail View Editor by clicking on any progress bar within Epic Sum Up. These progress bars can be in the
Summary Panel
Dashboard gadget
Custom fields
Issue Navigator
Outside of the progress bars, another way to access the Detail View Editor is through the issue navigator. On the top Jira bar, click on the Filter button and access the drop down menu. From this menu, click on Advanced Issue Search.
Using the JQL filters (or the basic filters), go to the Epic Sum Up button in the top right corner of the screen. This will bring up the Detail View Editor. From here you can start editing your issues.
Kanban and SCRUM boards
The Epic Sum Up button in the upper right corner opens up the Detail View Editor. From here you can jump between different boards, filter your scope with quick filters and start editing your issues.
What can you use the Detail View Editor for?
Getting a detailed project overview
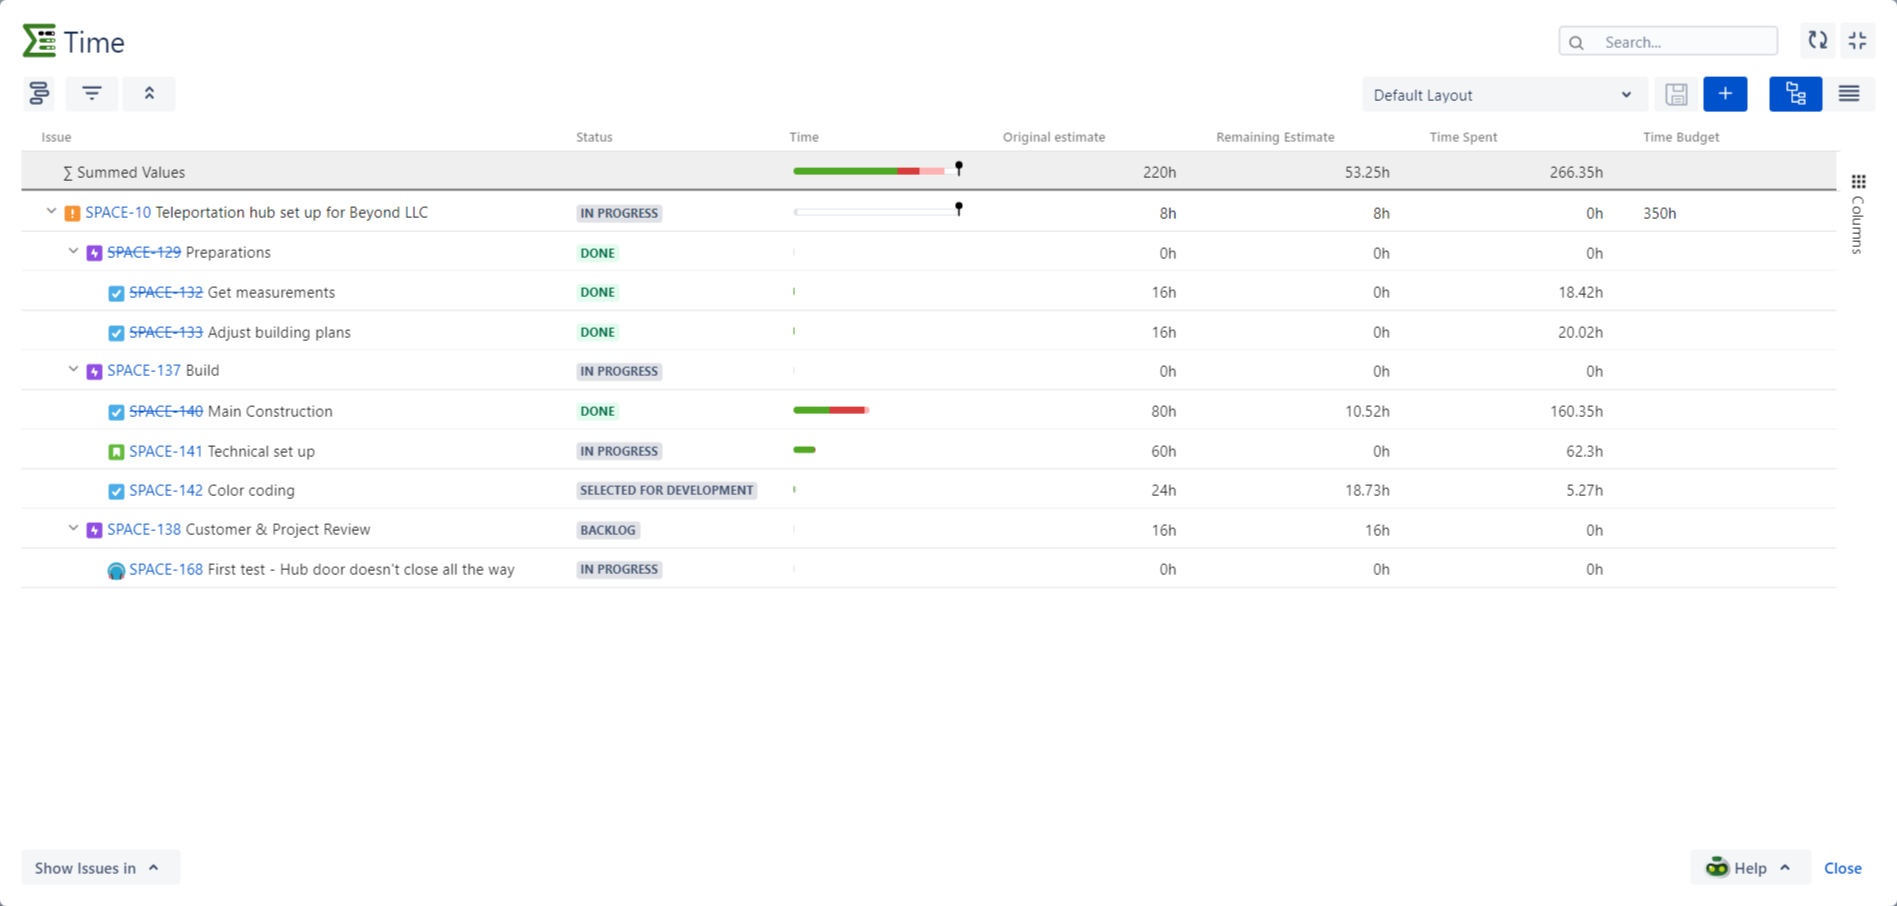
With the Detail View Editor in Epic Sum Up, you can get a more detailed look at your projects. Customize column layouts, sort within columns, collapse and uncollapse issue hierarchies, etc…
See which issues went over estimation/budget
The DVE offers you the ability to view the time spent on issues. You can view this in a progress bar, or you can view it with original estimate, remaining estimate, and time spent fields. There is also a time budget field.
Make hidden hierarchies visible
Using the Detail View Editor within Epic Sum Up, you can click on a progress bar and the hidden hierarchy will be made visible–with child issues now completely visible to a project manager.
Recalibrating projects
You can easily adjust values including things like estimates, assigned users, etc, by double clicking any field to change it. This allows you to recalibrate projects when necessary.
Export issue hierarchy
Make use of easy exporting to common file formats, as well as EverIT & Tempo Time Sheets!
Features

Columns
On the right-hand side of the Detail View Editor, you will see a columns icon. This is the columns selector. With the columns selector, you can add or remove any columns you wish.
See a list of which columns are available here.
Within the Detail View Editor, Epic Sum Up offers you the ability to drag & drop columns, into any order you wish.
When you are dragging and dropping columns within the Detail View Editor, you can make them “sticky” to keep them in one place. To make a column sticky, drag it over to the far left side of the DVE or use the pin option next to the column filters, and the column will “embed” itself. However, you can always drag the column back to another position.
To remove a column from your configuration, you can click on the columns icon to the right of the Detail View Editor, and click on the checkbox buttons to deselect certain columns and remove them. Another option is to move the column up to remove it, this is a bit faster.
You have the ability to sort by almost any column.
Layouts
Within the Detail View Editor, once you have configured your columns in the order that you want, you have the ability to save this configuration as a layout. To save a configuration as a layout, click on the + icon in the upper right hand corner of the Detail View Editor. Once you have clicked +, you can name the layout and save it.
When you are saving your column layout, by default it will save it for your user only. However, if you are a Jira administrator, you can save your column layout as a global layout.
To do this, click on the + icon as you normally would to save the layout. As an administrator, you will see a button that says Create Layout as Global, on the bottom left corner of the pop up window.
You can also save layouts as default for specific progress bars in the progress bar configuration.
To edit a layout, add/remove columns to your preferences, then click on the disk 💾 next to the + to save your edits.
Filtering
Epic Sum Up allows you to quickly search text fields within the Detail View Editor. To do this, use the search bar in the upper right corner of the screen.
Epic Sum Up additionally offers predefined filters for your convenience. To access these filters, navigate to the upper left corner of the Detail View Editor screen, and click on the filters button to open a drop-down menu. The following predefined filters are available:
Completed issues
Not completed issues
Over original estimation
Closed issues with remaining time
You can also reset filters from this same menu.
It’s important to note that when you are filtering columns in Epic Sum Up, it is issue based - that is, only the issue values, not aggregations, will be taken into account.
Views of Issues
Epic Sum Up allows you to change your views of different issues, so that you can gain a better understanding of your overall project.
Epic Sum Up offers the ability to arrange your issues so that you can use collapsing functions to change your views of said issues. To access collapsing functions, navigate to the collapse button in the upper left hand corner of the DVE.
Clicking on the collapse button will offer you the ability to collapse all, or expand all. In between those options, you will see how many different levels of issues you have that you can collapse/expand to.
Within a hierarchy view, you will be able to collapse individual levels yourself.
Within a hierarchy view, if you collapse a given hierarchy, it is important to note that only numerical values (time values, story points, etc) within this hierarchy will be aggregated.
To get to the list/hierarchy view, first open up the Detail View Editor - within the DVE you will see buttons in the top right for both the list & hierarchy view.
Once you’re in the hierarchy view (it is on by default), you will be able to see how many levels are in the hierarchy. Collapsing functions only work in the hierarchy view.
Epic Sum Up offers the ability to navigate up and down between issues so that you can focus on adjusting parts of your hierarchy, one at a time.
To navigate to a parent issue, click on the navigate up button in the upper left corner and select a parent from the drop down menu.
To navigate to a child issue, right click on the issue you want to navigate to and select the option Go-to:’Issue Key’.
Editing
To edit inline, double click on any field (aggregation or not) in the Detail View Editor, and change it as you wish.
Please note that aggregations can’t be edited. When editing a field from a collapsed issue you are editing the issue value.
Inline editing is available for certain column fields, that you can select with the column button, except for the progress bars.
See a list of which fields can be seen, and which can be edited here.
To assist you with your editing tasks, Epic Sum Up supports copy & paste functionality.
You can either choose to copy & paste by right clicking on the appropriate fields, or you can select fields with the mouse, then use the keyboard shortcuts (CTRL + C, CTRL + V).
Examples:
An example of how copy & paste could be useful, would be that you have the option to copy and paste an assignee to multiple issues in Epic Sum Up, rather than manually assigning a team member for every issue.
Within Epic Sum Up, you can modify the fix versions using copy & paste, rather than selecting the version number manually. This process is the same for components….
Within the Detail View Editor, Epic Sum Up allows you to create new issues. To create a new issue, click on the plus on the right side of the issue column. Select the issue type, type in a summary and press enter.
To the right you can see the project the issue will be created in, open up the issue in the create dialog or cancel.
Exporting
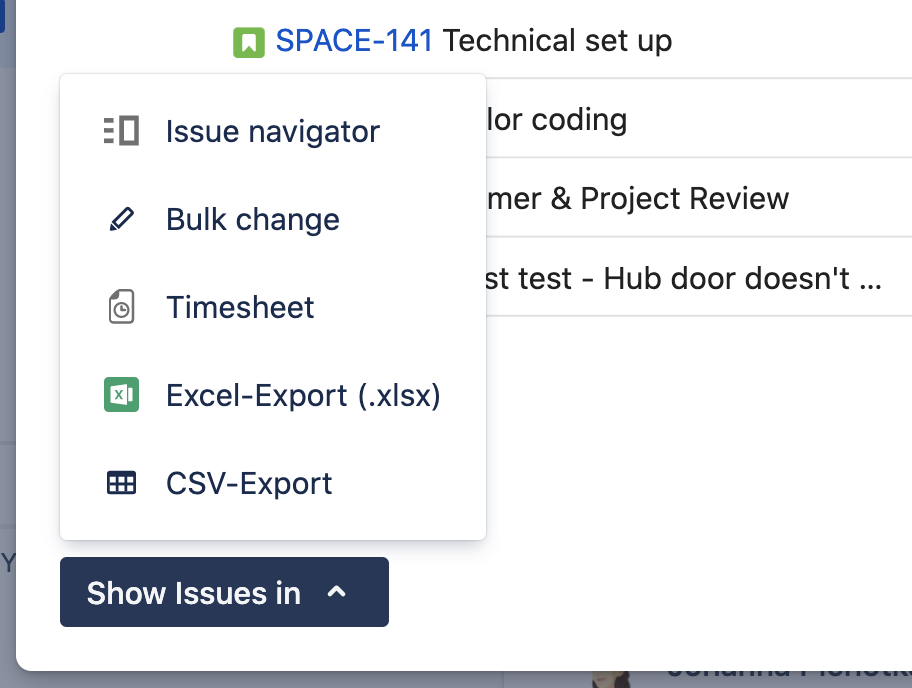
Epic Sum Up allows you to export your list of issues to view them in other software tools. To export, navigate to the lower left hand corner of the DVE screen, and click on the Show Issues In button. Below, we will go over the different options you can use for exporting.
The following options are available for Epic Sum Up:
Issue Navigator
Tempo Time Sheet
EverIT Time Tracker
Excel Export
CSV Export

